As noted in our previous post, I (Jennifer) recently bought a fully electric car, a 2022 Kia Niro EV. During the month of November, we took a road trip from our home in the Spokane, Washington area to southern California (and back) in my new car. Here are some notes from the trip. Warning: some data, math, graphs, and physics included! Second warning: If you’re not interested in electric vehicles (EVs), you probably want to stop reading this post after the first few sections. Sorry about that! I did try to put the sections that might be more interesting to people who are not EV enthusiasts first.
Sleeping in the car
We stayed with friends/family on our way down to southern California, and we had a place to stay for the time we were in southern California. But on the way back we were in a hurry, so we spent one night in a rest area on the highway, and we actually got a pretty decent night’s sleep in the car. To facilitate sleeping in the car, Zach had built platforms for his current and previous car (see other posts in this blog), but in my car, we didn’t use a platform. Instead:
- Before the trip, we cut out window shades for all the windows from “Reflectix” reflective insulation (you can buy a big roll of it at Home Depot or elsewhere). This was rather tedious, but it’s worth doing, because the shades really cut the light down so you can sleep.
- Before the trip, we purchased two Sterlite 20 gallon (76 liter) storage boxes, 22 1/8″ x 18 5/8″ x 16 7/8″ (56.2 cm x 47.3 cm x 42.9 cm), and packed them full of stuff for the trip. We also got some camping window screens for the back windows — these are made of mosquito netting, and go over the top of the doors like a hat.
- When packing the car, we put the back seats down flat and removed the back head rests. The two Sterlite boxes fit well in the cargo area, and are just the right height not to block the view out the back.
- When it was time to sleep, we put the shades in the windows (at least the front window needs to be done before the rest of the steps), and opened the back windows a bit for ventilation. There weren’t any insects around, so we didn’t use the window screens.
- We moved and un-reclined the front seats as far forward as they would go, and we should have (but we didn’t think of it) telescoped the steering wheel in as far as it would go.
- We put the two storage boxes between the front seats and the back seats. They fit perfectly there, and are about the same height as the folded-down back seats.
- We piled all of our other stuff into the front seats. It barely fit.
- We put down our camping sleeping pads and had a pretty good night of sleep in our sleeping bags.
I forgot to take a picture of the car all set up for sleeping on our night in the rest area, but I did a quick re-creation of it and here’s what it looks like (minus the window shades, stuff in the front seats, and sleeping bags):

Eating in the car
When you’re on a road trip in an EV, the refueling stops take a little time — at least 20 minutes (see below). Usually our priorities at each charging stop were to use the bathroom, walk around a bit, and eat; due to the pandemic, we generally would walk somewhere nearby to get take-out food and then either eat it on an outdoor table, or in the car if the weather was bad.
To make eating in the car easier, we had with us a few things that were quite useful:
- Utensils: The plastic utensils that are given out with take-out food are wasteful, and not all that good for eating with. Also, sometimes you might get food at a grocery store instead of a take-out restaurant. So, it’s helpful to bring along some more sturdy forks and spoons (or “sporks” with a fork on one end and a spoon on the other), a folding sharp knife, and a compact can opener.
- Napkins: Usually even if you ask a fast food establishment to not give you napkins, they do anyway, so there’s always a good supply in the car.
- Water: If you bring your own reusable water bottles, and fill them up with ordinary tap water, you can avoid having to get drinks at a restaurant and avoid the waste of buying bottled water.
- Tables and chairs: We had compact camping chairs and a small camp table with us, although we didn’t end up using them on this trip.
- Clipboards: 11×17″ clipboards (made for drawing I think) served well as lap tables if we were eating in the car (to catch spills and provide a flat surface for the food).
Vehicle features
My car has several “smart” features that were helpful for the road trip, some of which make it pretty close to a self-driving car:
- Adaptive cruise control: You can set a maximum cruise control speed, and the car will slow down to stay a safe distance behind the car ahead of it in the lane. Even if it’s set to 70 mph, for instance, the car can automatically stop and go in heavy traffic.
- Automatic steering: On the highway, you can set the car to keep itself in the traffic lane, although it will beep at you if you take your hands off the steering wheel for more than a few seconds. I’ve found that around town and on curvy roads, I don’t like to use this feature — I feel like the car is fighting me when I’m trying to steer it — so I usually have it set to just beep if it thinks I’m getting out of the lane rather than steering me back into the lane.
- Blind spot detection: If you put on your blinker, the car will beep at you if it detects that there is a car in your blind spot in the lane you are about to change into. There is also a visual indicator in the side mirror.
- Settings profiles: The car has a lot of settings for the electronic systems. Zach and I had different preferences for some of them; luckily, the car allows you to set up separate settings profiles for each person, making it easy when switching drivers to get the car set up the way each person likes it.
Charging the car
Warning: This is where the geeky, nerdy, EV enthusiast content starts!!
Units: capacity, charging rate, efficiency, and range
Battery capacity for EVs is typically measured in kWh (kilowatt-hours), which is a unit of energy. My 2022 Kia Niro EV has a battery capacity of 64 kWh. It should be noted, however, that the owner’s manual advises you to only charge the car to 80% of its capacity as a general rule, to preserve battery life (we made exceptions to that occasionally on our road trip to get a longer driving range).
Charging rate for EVs is typically measured in kW (kilowatts), which is a unit of power (power is energy per unit time). For example, if you charge for 1 hour at 1 kW, you will add 1 kWh to your battery; 2 hours at 4 kW will add 8 kWh. Also for electric power, if you multiply the number of volts (V) by the number of amps (A) you get the power in watts; divide by 1000 to get kW. As an example, if you draw 10 A from a standard 120 V outlet, you are using 1.2 kW of power. There is one caveat to that: electrical power in your home is alternating current (AC), which has to be converted to direct current (DC) in order to charge your battery, and you’ll lose a small amount of the power in that conversion.
EV efficiency (in the US) is typically measured in mi/kWh, or the number of miles you can drive per kilowatt-hour; multiplying the battery capacity by the average efficiency gives you the total EV range in miles. The efficiency of any EV varies a lot depending on how fast you are driving, the terrain, the wind, and using the heater (the air conditioner and seat heaters do not seem to make much of a difference, but unlike a gas-powered car there is no free heat from the engine, and the electric air heater uses a lot of energy). In October, driving around town, I was typically getting over 4 mi/kWh without the heat and closer to 3 mi/kWh with the heat.
On our road trip, we averaged about 3.3 mi/kWh, which is somewhat lower than my around-town efficiency due to the faster driving speeds on highways, but we didn’t have to use the heat much. That gives us a range of about 210 miles on average. But given that it takes a lot of time to charge to more than about 80% (see below), and that we also didn’t want to have the car completely run out of charge and stop dead in the road, we usually wanted to stop and charge every 150 miles or less; also the efficiency varied a lot due to terrain and winds. The longest we actually went between charges was the 172 miles between Madras, OR, and Hermiston, OR — which was cutting it pretty close on the range, especially when a headwind in the Columbia River gorge on the way down cut our efficiency down considerably! But without going 40 miles out of our way, there wasn’t any alternative working fast DC charger we could have stopped at, so we spent a long time charging up as much as possible in Hermiston (and Madras on the way back) and managed to make it.
Charging rate
There are three “levels” of EV charging:
- Level 1: Plug the charging cable supplied with the car into a standard 120V outlet, and plug the J-1772 output plug on the other end into your car.
- Level 2: Plug the J-1772 output plug from a home, portable, or commercial A/C charging unit (known as an EVSE or Electric Vehicle Supply Equipment) into your car. Level 2 EVSEs use a 240V electrical supply (like an electric kitchen stove, electric clothes dryer, or an RV outlet at a campground). They cost around $300 and up; we have two level 2 EVSE units in our garage now, which supply up to 24A (5.7 kW) and 40A (9.6 kW) respectively (the 24A one was free from our electric utility; they own it). I also have a portable EVSE made by Sky Intelligent for Shell, which can go up to 32A (7.6 kW) on a 240V supply and also supports level 1 charging (they also make a 40A unit, but my car can only draw 30A).
- Level 3: Visit a commercial DC fast charging station that provides a compatible plug (there are 3 standard but mutually incompatible plugs in use in the US; my car uses the CCS plug, but cannot use the Tesla or CHAdeMO plug). Note that the owner’s manual in my car says that frequent DC charging is not good for the battery life, so it’s best to stick to level 2 as a general rule and only use DC fast charging when you need it (like on a road trip).
On level 1, my car will draw about 10 A (1.2 kW), so it takes more than 2 days to fully charge my car. That’s a long time, but if you are just using the car around town, you’re unlikely to use up more than 25% of the battery in a day. So if you plug it in when you get home and leave it plugged in all night, you can usually recharge fully using this method.
On level 2, my car charges at about 7.5 kW with a 32A or higher EVSE (the most it will draw is 32A), which means it can fully charge in about 9 hours.
The charging rate for level 3 (DC) depends on a number of factors, but it’s a lot faster than level 2 charging. Each level 3 station has a maximum voltage and current it will supply, which may depend on its state of repair and how many other vehicles are charging at the time. Each EV also has a maximum voltage and current it will accept; these vary with the car, the current state of charge of the battery, and how hot or cold the battery is. So even if a given level 3 station says it will provide 350 kW (they only give you the power number, not the volts or amps), if your car will not accept the current or voltage the station supplies, your charging rate will be lower.
My car’s maximum DC charging rate is about 75 kW. However, even under ideal battery temperature conditions, this gets reduced by the car’s electronics when the battery gets to about 55% charged; there’s another step down around 73%, and more reductions as the battery gets more charged. This reduction in charging rate as the battery charges happens on every EV, and is known as the charging curve. On our road trip, we were able to get pretty good data about my car’s charging curve, and here’s a graph of it:
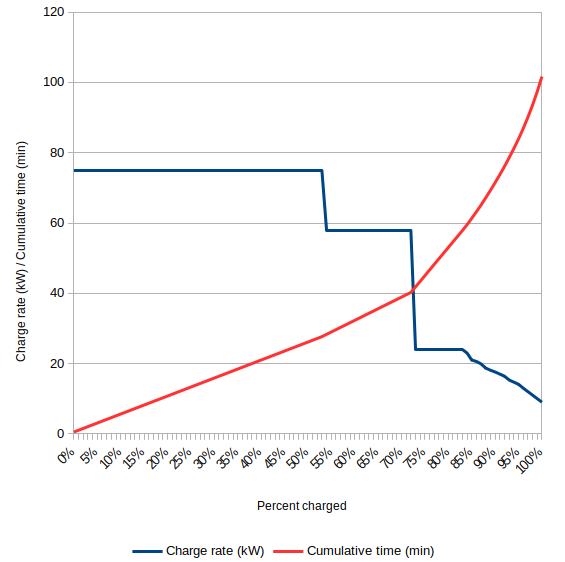
The main implication of the charging curve of my car is that once the car reaches about 73% charged, if there are plenty of charging stations available down the road, we are better off (time-wise) to unplug and get driving than to wait for more charging to happen, because it gets way slower around then. And if you’re trying to make it through a stretch without chargers at the limit of your range, it’s going to take a long time to get those last few % of charge as the charging rate keeps getting slower and slower.
Update 6 Feb 2022: Last night, out of curiosity, I charged the car up to 100% on the level 2 charger that Zach normally uses, which measures the charging rate. It stayed at a fairly constant 7.5 kW until the battery was about 97% charged, and then the charging rate dropped off in steps for the last 30 minutes of charging. So basically it takes a little over 8 hours to get 97% charged, and then 30 more minutes for that last 3%.
Charging cost
If you charge your car at home, you’ll pay your electric utility a rate per kWh you use; level 1 and 2 charging at home would be the same cost unless your utility charges you for your peak draw or by the time of day when you charge. We recently installed solar panels (see previous post), which should (averaged over the year) supply the amount of electricity we would need to charge both of our cars (meaning that we’ve effectively pre-paid for our EV charging in the cost of the solar system).
Outside the home, you may or may not have to pay for charging, and the cost depends on where you charge. For example:
- If you bring a portable level 1/2 charging cable/EVSE, and find a suitable outlet, you may be able to charge for free or pay your lodging, campground, or friends a small amount for the electricity you use. Keep in mind that there are several types of 240V outlets, however! (RV parks have NEMA 14-50 outlets; your friend with an electric dryer in the garage might have a 3-prong NEMA 10-30 or 4-prong NEMA 14-30 outlet. You may need to bring an adapter to plug your portable EVSE into a different type of outlet.)
- Some businesses, hotels, and parking lots offer free level 2 charging to employees or customers, by plugging their EVSE’s J-1772 plug into your car.
- In California, the state agency CalTrans has installed free nominally 100 kW DC chargers at a number of rest areas and nearby spots (although the highest charging rate we got was about 45 kW).
- DC charging networks have different pricing structures and plans. The prices we paid on our trip to California ranged from 19 to 86 cents per kWh for actual charging stops (as compared to 8 to 9 cents per kWh for our home electricity).
- At some charging stations you pay by the minute instead of by the kWh. For those, you’re going to pay a lot more for your car’s range on the slow part of the charging curve. At others, you pay a base fee and then a per kWh cost. For those, you’re better off staying longer to get your money’s worth on the base fee.
- Over Thanksgiving weekend, when we were driving home, Electrify America had all of their charging stations set to charge for free.
- On the way down, we averaged about 10 cents per mile for charging costs. This is comparable to an efficient gas car (for instance, if it gets 40 mpg and gas is $4/gallon). On home charging, a kWh costs us up to 9 cents (without the solar panels) and it gets us at least 3 miles of driving, so it’s under 3 cents per mile.
Finding chargers and planning your charges
If you’re on a road trip, you’ll need to locate charging stations. Some thoughts:
- In order to spend the least time charging, you’ll need to understand your car’s charging curve. For instance, in my car the best charging rate is between 0 and about 55% charged, and it’s reasonably fast up to about 73% charged. So if you’re in an area (like southern California) with a lot of charging stations, it will make the trip faster to stop more often and charge up to a lower percent charged than to stop less frequently and charge up higher.
- Not all the charging stations are actually functional at any given time. In order to figure out ahead of time which station to stop at, I recommend using the PlugShare app or web site. They list details on chargers from all the networks (you can filter based on the connector your car uses), and members leave reviews stating whether or not they were able to charge and their peak charging rate. I think we left reviews at all the stations we stopped at on our trip, whether they worked or not (but most of them did work, since we checked reviews ahead of time).
- You can plan an overall route that is time-efficient using the A Better Route Planner app or web site.
- Once you figure out which chargers you might be using on your route, I recommend getting the apps for all the charging station networks that you might use, and signing up for accounts before you leave. Some thoughts on charging network apps:
- Look at the app reviews on the Google Play Store (or Apple equivalent) — for instance, the Greenlots app had terrible reviews. I tried it anyway, and it didn’t work for me (I was able to get a refund of what they charged me for the failed charging at least).
- Some networks’ apps work for multiple networks, in theory anyway. For example, the Chargepoint app says you can also charge at Greenlots, EVBox, Flo, and EVGo charging stations. But if you plan to rely on this, check the app ahead of time to make sure that the specific station you plan to use is shown in the app! Otherwise, you may get to a station and not be able to charge.
- Some networks will send you a free RFID card that may work better than their apps; other networks that issue cards make you pay for them (like Greenlots). I haven’t yet tried one of these cards.
- Some networks let you pay at the station by credit card. But not all of them do that, and based on reviews I’ve seen on PlugShare, I think it’s more reliable to use the network app than to try to use a credit card.